There are many tricks to add recent posts and recent comments widget to blogger. Here I am gonna show you a simple way to add these widgets:
Let's do few steps:
Sign in your blogger and then click on Design and the add Gadget and Feeds.
 Now all you need to do is copy these codes and paste. For recent post: http://YOUR BLOG.COM/feeds/posts/default. And for recent comments: http://YOUR BLOG.COM/feeds/comments/default
Let's do few steps:
Sign in your blogger and then click on Design and the add Gadget and Feeds.

Another good news for bloggers. At earlier times we use to use hit counters and stats tools from other sites. That was hard to do coz every one had not that skill to do. But, we don't need to be too worry. Because, blogger is lunching nice features one after another. And now blogger lunches "Blogger Stats". It enable to know us easily how our blog is popular. How many people are visiting our blog. and winch post is the most viewed etc.

Now we don't have search for this kind of stats checker in other sites and...wasting time..and we don't need to add gadget for it.
We have seen popular posts widgets in blogger. But they were developed by others. And to get that we had to do so many things and that was too difficult task. Now Blogger in Darft has made it easy. All we need to do is follow few steps:
First of all we need to sign in our blogger with Draft Blogger.
Then 'Design'
'Page Elements'
And 'add a gadget'
'Popular Post'.

First of all we need to sign in our blogger with Draft Blogger.
Then 'Design'
'Page Elements'
And 'add a gadget'
'Popular Post'.

You can optimize it as your wish.
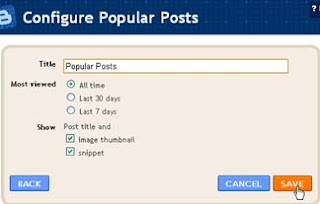 And Save it.
Take a look.
Now your popular or most visited posts will be displayed on your sidebar.

Take a look.
Now your popular or most visited posts will be displayed on your sidebar.
Now a days sliding featured content is so popular. Because it gives nice look to blog and it makes easy to find posts on blog. So I was trying to find this for my blog finally I found it and now enjoying this feature.

So I wanna share this useful tips to you all blogger friends. Come on and follow few steps I have shown below:
1. First of all Sign in your Blogger and then Design and then edit "Html"
2. 'Expand Widget Templates'
3. Ctrl+F for search and find
</head>
4. Then paste following codes just before it.
<style>
#myGallery, #myGallerySet, #flickrGallery {
width: 600px;
height: 200px;
margin: 5px;
z-index:5;
border: 1px solid #000;
}
.jdGallery .slideInfoZone
{
position: absolute;
z-index: 10;
width: 100%;
margin: 0px;
left: 0;
bottom: 0;
height: 61px;
background: #000;
color: #fff;
text-indent: 0;
overflow: hidden;
}
</style>
<!-- begin gallery scripts -->
<link charset='utf-8' href='http://sites.google.com/site/everythingaboutblogging/featured/jd.gallery.css' media='screen' rel='stylesheet' type='text/css'/>
<script src='http://sites.google.com/site/everythingaboutblogging/featured/mootools.v1.11.js' type='text/javascript'/>
<script src='http://sites.google.com/site/everythingaboutblogging/featured/jd.gallery.js' type='text/javascript'/>
<!-- end gallery scripts -->
<script type='text/javascript'>
function startGallery() {
var myGallery = new gallery($('myGallery'), {
timed: true
});
}
window.addEvent('domready',startGallery);
</script>
5. Now search for this code:
<div id='main-wrapper'>
6. Paste following codes just below this code:
<div id='featured'>
<div id='myGallery'>
<div class='imageElement'>
<h2>YOUR TITLE</h2>
<p>SHORT DESCRIPTION OF YOUR POST...</p>
<a class='open' href='LINK OF YOUR POST' title='Read More'/>
<img class='full' src='LINK OF YOUR POST PHOTO'/>
<img class='thumbnail' src='LINK OF YOUR POST PHOTO'/>
</div>
<div class='imageElement'>
<h2>YOUR TITLE</h2>
<p>SHORT DESCRIPTION OF YOUR POST...</p>
<a class='open' href='LINK OF YOUR POST' title='Read More'/>
<img class='full' src='LINK OF YOUR POST PHOTO'/>
<img class='thumbnail' src='LINK OF YOUR POST PHOTO'/>
</div>
<div class='imageElement'>
<h2>YOUR TITLE</h2>
<p>SHORT DESCRIPTION OF YOUR POST...</p>
<a class='open' href='LINK OF YOUR POST' title='Read More'/>
<img class='full' src='LINK OF YOUR POST PHOTO'/>
<img class='thumbnail' src='LINK OF YOUR POST PHOTO'/>
</div>
<div class='imageElement'>
<h2>YOUR TITLE</h2>
<p>SHORT DESCRIPTION OF YOUR POST...</p>
<a class='open' href='LINK OF YOUR POST' title='Read More'/>
<img class='full' src='LINK OF YOUR POST PHOTO'/>
<img class='thumbnail' src='LINK OF YOUR POST PHOTO'/>
</div>
</div>
</div>
7. Preview it. If it is working then 'Save Template'. Ok enjoy the featured content on your blog. I hope you will do it for your blog.
Hello....Blog World! I am here with my second post for this blog. Here I am gonna share the idea how to add Facebook Comment form to the blogger? That I had just added to this blog. It gives a unique look to your blog and ya of course! it is much better to get visitors to our blog. Cos if you comment on blog you can post that comment on your Facebook home automatically. That means all your friends will get it as your new feed. And it will motived your friends to visit the blog. OK then let's get started:
1. First of all you need to setup a Facebook application and get API code. For that go to Facebook Developers

2. Sign in your blogger. 'Design' then click on 'Edit html' and check the expand.
3. Find following code:
<data:post.body/>
4. Just after that paste following codes.
<b:if cond='data:blog.pageType == "item"'>
<p align='left'><img alt='' class='icon-action' src='http://i740.photobucket.com/albums/xx45/latoboy/cooltext466468743-1.png'/></p>
<div id='fb-root'/>
<script>
window.fbAsyncInit = function() {
FB.init({appId: 'YOUR API KEY', status: true, cookie: true,
xfbml: true});
};
(function() {
var e = document.createElement('script'); e.async = true;
e.src = document.location.protocol +
'//connect.facebook.net/en_US/all.js';
e.async = true;
document.getElementById('fb-root').appendChild(e);
}());
</script>
<fb:comments width="450"></fb comments>
</b:if>
5. Place your API CODE and then save your template.
6. Change the number 450 your need.
6. Change the number 450 your need.
7. Check out your posts...


Visitor's Comments