There are many tricks to add recent posts and recent comments widget to blogger. Here I am gonna show you a simple way to add these widgets:
Let's do few steps:
Sign in your blogger and then click on Design and the add Gadget and Feeds.
 Now all you need to do is copy these codes and paste. For recent post: http://YOUR BLOG.COM/feeds/posts/default. And for recent comments: http://YOUR BLOG.COM/feeds/comments/default
Let's do few steps:
Sign in your blogger and then click on Design and the add Gadget and Feeds.

Yeah guys, finally Facebook releases one more security option for it's users. Last Saturday Facebook lunched it for all users. Now we can feel more secure our Facebook account. Mostly it is useful for those who use Cyber Cafe and in case if they forget to log out their account. And we all know that now days there are so many hackers who can easily hack our account. If it happened we can receive all details through email or sms after activating this security option. So let't check it out right now:

Ok I'll tell you the steps:
1. Go to your Facebook Account then click on Account setting.
2. Click on Account Security and change.
3. If you wanna receive email and sms click on button and save.
If other people is using your account there will be all details. and you can log out your account.
We have seen popular posts widgets in blogger. But they were developed by others. And to get that we had to do so many things and that was too difficult task. Now Blogger in Darft has made it easy. All we need to do is follow few steps:
First of all we need to sign in our blogger with Draft Blogger.
Then 'Design'
'Page Elements'
And 'add a gadget'
'Popular Post'.

First of all we need to sign in our blogger with Draft Blogger.
Then 'Design'
'Page Elements'
And 'add a gadget'
'Popular Post'.

You can optimize it as your wish.
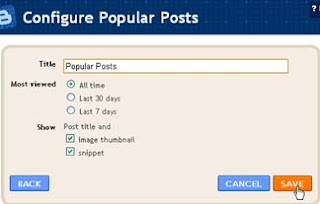 And Save it.
Take a look.
Now your popular or most visited posts will be displayed on your sidebar.

Take a look.
Now your popular or most visited posts will be displayed on your sidebar.
Facebook has lunched their official live video streaming channel.

They aims provide a deeper look into our features, partners & employees. We bring you special guests, latest innovations, and live events from Facebook headquarters in Palo Alto. Good luck Facebook. keep going on........
Last night I was logging in my Facebook Account Then my eyes motivated by a yellow box appeared on the top of my application box under profile pic. That was a notice shown by Facebook developer. Notice was like this: Soon Facebook will no longer support profile boxes from applications. Learn more about this change in the Help Center.

The pic above is a snap taken from a page created by me. I had made this after hard working of long time. See now I am gonna lose it. And I am so worried. I wish that Facebook will provide better feature than now. Ok guys...see ya.......
Now a days sliding featured content is so popular. Because it gives nice look to blog and it makes easy to find posts on blog. So I was trying to find this for my blog finally I found it and now enjoying this feature.

So I wanna share this useful tips to you all blogger friends. Come on and follow few steps I have shown below:
1. First of all Sign in your Blogger and then Design and then edit "Html"
2. 'Expand Widget Templates'
3. Ctrl+F for search and find
</head>
4. Then paste following codes just before it.
<style>
#myGallery, #myGallerySet, #flickrGallery {
width: 600px;
height: 200px;
margin: 5px;
z-index:5;
border: 1px solid #000;
}
.jdGallery .slideInfoZone
{
position: absolute;
z-index: 10;
width: 100%;
margin: 0px;
left: 0;
bottom: 0;
height: 61px;
background: #000;
color: #fff;
text-indent: 0;
overflow: hidden;
}
</style>
<!-- begin gallery scripts -->
<link charset='utf-8' href='http://sites.google.com/site/everythingaboutblogging/featured/jd.gallery.css' media='screen' rel='stylesheet' type='text/css'/>
<script src='http://sites.google.com/site/everythingaboutblogging/featured/mootools.v1.11.js' type='text/javascript'/>
<script src='http://sites.google.com/site/everythingaboutblogging/featured/jd.gallery.js' type='text/javascript'/>
<!-- end gallery scripts -->
<script type='text/javascript'>
function startGallery() {
var myGallery = new gallery($('myGallery'), {
timed: true
});
}
window.addEvent('domready',startGallery);
</script>
5. Now search for this code:
<div id='main-wrapper'>
6. Paste following codes just below this code:
<div id='featured'>
<div id='myGallery'>
<div class='imageElement'>
<h2>YOUR TITLE</h2>
<p>SHORT DESCRIPTION OF YOUR POST...</p>
<a class='open' href='LINK OF YOUR POST' title='Read More'/>
<img class='full' src='LINK OF YOUR POST PHOTO'/>
<img class='thumbnail' src='LINK OF YOUR POST PHOTO'/>
</div>
<div class='imageElement'>
<h2>YOUR TITLE</h2>
<p>SHORT DESCRIPTION OF YOUR POST...</p>
<a class='open' href='LINK OF YOUR POST' title='Read More'/>
<img class='full' src='LINK OF YOUR POST PHOTO'/>
<img class='thumbnail' src='LINK OF YOUR POST PHOTO'/>
</div>
<div class='imageElement'>
<h2>YOUR TITLE</h2>
<p>SHORT DESCRIPTION OF YOUR POST...</p>
<a class='open' href='LINK OF YOUR POST' title='Read More'/>
<img class='full' src='LINK OF YOUR POST PHOTO'/>
<img class='thumbnail' src='LINK OF YOUR POST PHOTO'/>
</div>
<div class='imageElement'>
<h2>YOUR TITLE</h2>
<p>SHORT DESCRIPTION OF YOUR POST...</p>
<a class='open' href='LINK OF YOUR POST' title='Read More'/>
<img class='full' src='LINK OF YOUR POST PHOTO'/>
<img class='thumbnail' src='LINK OF YOUR POST PHOTO'/>
</div>
</div>
</div>
7. Preview it. If it is working then 'Save Template'. Ok enjoy the featured content on your blog. I hope you will do it for your blog.

Hi friends today I've added Favicon to this Blog. I took almost 10 minutes to add favicon. And now it looks unique and coo. So guys here I am come up with this article how to add favicon to blogger. OK then let's discus on this topic. First of all you need to make a logo or icon. For that I use Cooltext.com Then you need to generate favicon. I recommend you to use Iconj Which is so easy and fast.

Upload your photo to generate icon/favicon.

Copy the link like shown above picture.
Sign in your blogger.
Design and edit html and check expand.
Then find following code:
<b:skin><
2. Sign in your blogger. 'Design' then click on 'Edit html' and check the expand.
3. Find following code:
<data:post.body/>
4. Just after that paste following codes.
<b:if cond='data:blog.pageType == "item"'>
<p align='left'><img alt='' class='icon-action' src='http://i740.photobucket.com/albums/xx45/latoboy/cooltext466468743-1.png'/></p>
<div id='fb-root'/>
<script>
window.fbAsyncInit = function() {
FB.init({appId: 'YOUR API KEY', status: true, cookie: true,
xfbml: true});
};
(function() {
var e = document.createElement('script'); e.async = true;
e.src = document.location.protocol +
'//connect.facebook.net/en_US/all.js';
e.async = true;
document.getElementById('fb-root').appendChild(e);
}());
</script>
<fb:comments width="450"></fb comments>
</b:if>
5. Place your API CODE and then save your template.
6. Change the number 450 your need.
6. Change the number 450 your need.
7. Check out your posts...


Visitor's Comments